


Website: https://www.techpowerup.com/review/inwin-airforce/
Introduction
The InWin Airforce, like the InWin Explorer, comes flat-packed and requires user assembly, much like IKEA furniture. The resulting mid-tower enclosure is meant to be able to handle plenty of potent hardware, including up to an E-ATX motherboard, while the InWin Explorer does not quite push the boundaries for an ITX chassis as much. With its two color variants InWin calls "Justice White" and "Phantom Black," you may also go the colorful route with the former, which really presses home the point that this is a case that came in individual parts.
| InWin Airforce | |
|---|---|
| Case Type: | Mid-Tower |
| Material: | Steel, plastic, and tempered glass |
| Weight: | 6.9 kg |
| Slots: | 8 |
| Drive Bays: | 2x Internal 3.5" 4x Internal 2.5" |
| Motherboard Form Factors: |
Mini-ITX, Micro-ATX, ATX, and E-ATX |
| Dimensions: | 528 x 270 x 537 mm |
| Front Door/Cover: | N/A |
| Front Fans: | 3x 120 mm (3x 120 mm Luna AL120 fans included) |
| Rear Fans: | 1x 120 mm (1x 120 mm Luna AL120 fan included) |
| Top Fans: | 3x 120 mm (optional) |
| Bottom Fans: | N/A |
| Side Fans: | N/A |
| Front Radiator: | 360 mm |
| Rear Radiator: | N/A |
| Top Radiator: | 360 mm |
| Bottom Radiator: | N/A |
| Side Radiator: | N/A |
| I/O: | 1x USB 3.2 Gen2 Type-C 2x USB 3.0 1x Headphone 1x Microphone |
| Fan/LED Controller: | N/A |
| Compatibility: | CPU Cooler: 170 mm GPU: 390 mm PSU: 180 mm |
Packaging


The InWin Airforce comes in a compact, branded package that is definitely smaller than the case itself. This means InWin can load more of these onto a palette and thus into a shipping container than with the chassis fully assembled. This translates into less spent on shipping per unit, which is partly why companies like IKEA are able to offer furniture at such competitive prices. A sticker on the box will let you know which Airforce color variant is inside.


The parts of the chassis are neatly stacked in individual layers within the box, starting with the small parts and accessories before the framing and dust filters, which are followed by the metal motherboard tray and, lastly, dedicated trays for each glass panel at the very bottom.
Contents

As we received the "Justice White" variant for review, the parts of the Airforce are made up of essentially five core colors: blue, red, yellow, white, and a gentle gray for some of the plastic components. The only parts that are actually metal are the motherboard tray and backplate.


On top of the pieces for the enclosure, you will receive an assorted set of black screws, zip ties, a metal GPU support bracket, and the backplates for the chassis. There is also an interesting rubber bit I could not figure out a use for. InWin also includes four retail-packaged Luna AL120 fans with the Airforce. This constitutes a $40–$50 value, which is packaged into the price. Lastly, there is an assembly manual to get the case itself built. For those needing help with putting in the system components, InWin has placed a QR code on the back of this booklet that takes you to a digital copy.
Building the Airforce


Building the Airforce mostly revolves around using one of the bags of screws with the highest count and longest size. While that is doable by comparing numbers and looks with those in the assembly manual, InWin could label the bags with simple numbers or letters to eliminate any guesswork. The first step in the build process revolves around the two frame pieces. InWin's vision would have you mix the red and blue colors together. That said, you could totally opt to have one blue and one red frame as well. They are held together by two screws. As these parts have a glossy finish, I left the protective layer on these for as long as possible to avoid scratching them. The second step is to assemble the two metal parts which make up the interior of the InWin Airforce with their own set of screws.
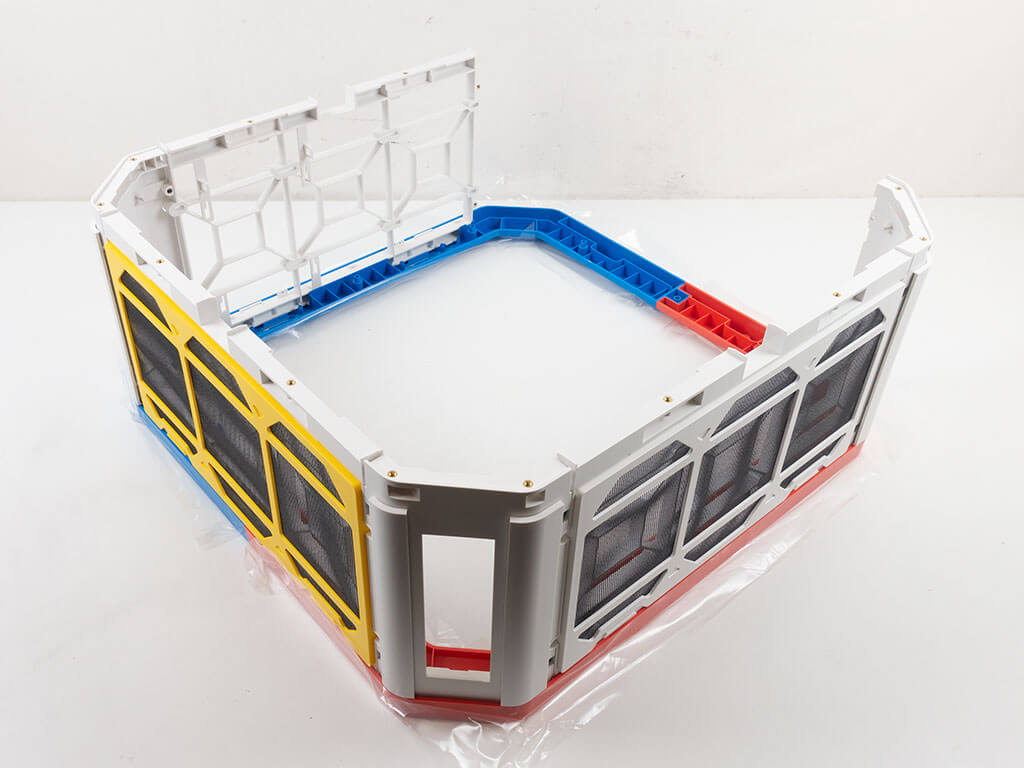

At this point, InWin mentions that you should put together the exterior panels and place it on one of the color frames. While doable, this should really be a separate step in the manual to help those who may find the process more challenging than others. You have to make sure you use the right corner pieces, which are very similar, but not quite identical. These are not symmetrical, which adds another layer of complexity. InWin does well to label the individual bags these come in, but once you unpacked them, things are no longer as clear.
With the shell and frame in place loosely, you also get to place the metal interior and attach the corner of the PSU bay with two screws. At this point, there is nothing holding the blue and red frame and rest of these parts together, so flipping it around for the next step means keeping a cool head as the metal will flex out of shape a bit until you screw it down.


With the chassis body flipped around, you get to employ most of the initially mentioned long screws in one fell swoop to both connect the blue and red frame to the shell and pin down the metal interior of the Airforce. Once this is done, the case has plenty of rigidity to it, so flipping it back over is no longer a big issue. At this point, you may place the second frame on the shell and screw it down. As you can see, I have also removed the plastic protective layer from this side, as the case body is essentially done at this point.


Before being able to stand up the Airforce, you have to clip on the feet, which come with pre-installed rubber pads. They do stay in place, but have a bit of play. I am sure InWin could have designed a way to use screws on them to pin things down better. In the interior, you may clip in the two blue HDD cages, which are actually really nicely engineered and stay put well.


The I/O panel for the InWin Airforce simply clips into the opening in the top of the case, but you have to make sure to connect the grounding wire to the metal housing as the plastic around the I/O component is essentially insulating it otherwise.

While not mentioned in the assembly manual explicitly, to really complete the case, the rear expansion slot brackets need to be installed. These parts are black and add a layer of contrast as well as a sixth color to the mix of the "Justice White" case variant. That said, it doesn't look bad at all.
A Closer Look - Outside


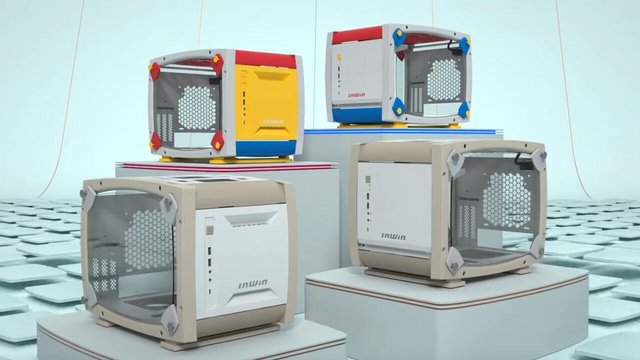
With the chassis fully assembled, I have to say the color mix is very refreshing to look at. This could certainly be a fun chassis for a teenager who wants a superhero themed system, for example. The glass panels are held in place nicely by two plastic components which are taped to the panel with heavy-duty double-sided adhesive. Spring-loaded plastic clips in the top secure it to the chassis itself and allow for a quick, tool-less release. As you will see in the following images, the four Luna AL120 fans have not yet been installed, as that will be done during the assembly process of the review.


The front of the chassis as we built it sports the yellow-framed, cloth dust filter. You may take it off to reveal mounting for three 120 mm fans, using the plastic shell structure. One could exchange the yellow cover on the top and the light gray on the front to tone this area of the chassis down a little bit, but that is purely subjective. In the rear, the InWin Airforce looks quite traditional with the PSU bay on the bottom of the chassis. If you look closely, you can see that there is a gap to the left and right of the metal panel.


The I/O panel is angled 45°, so reaching it should be alright regardless of whether the system is on the floor or on top of the chassis. A bright, square and yellow power button adds a colored element next to two USB 3.0, one USB-C, and dual audio headers. In the top is that second cloth dust filter you may remove the same way as the one in the front, once again revealing three 120 mm fan-mounting possibilities. This is no surprise as these flat shell elements of the Airforce are all identical.

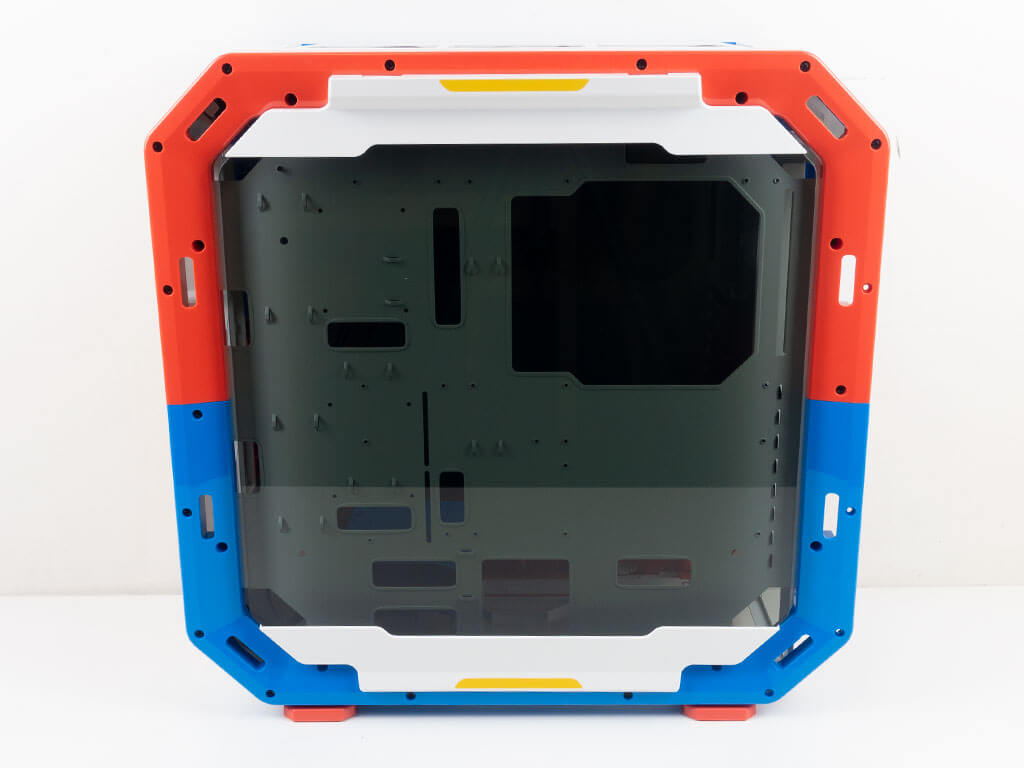
InWin opted for a 4-mm thick, noticeably tinted glass panel, which adds some nice contrast to the colorful "Justice White" version, but may be a bit much for the "Phantom Black" one. Each plastic strip on these comes with a yellow color element for a bit more "splash."


In the rear, the PSU bay at the bottom offers two sets of mounting holes, so point the fan of the unit point upward if you'd like. Above that are the eight expansion slots, each with their own removable cover. In the very top is the 120 mm fan mount with slightly elongated screw holes, so you can adjust its placement a bit to best fit your needs.

Looking at the underside of the InWin Airforce, you can see that this is the same shell piece as in the front and top of the chassis. InWin did not include a dust filter as it would not be easily removable due to the feet getting in the way. While that is understandable, one could argue that it would still be better to have a non-removable filter than none at all.
A Closer Look - Inside

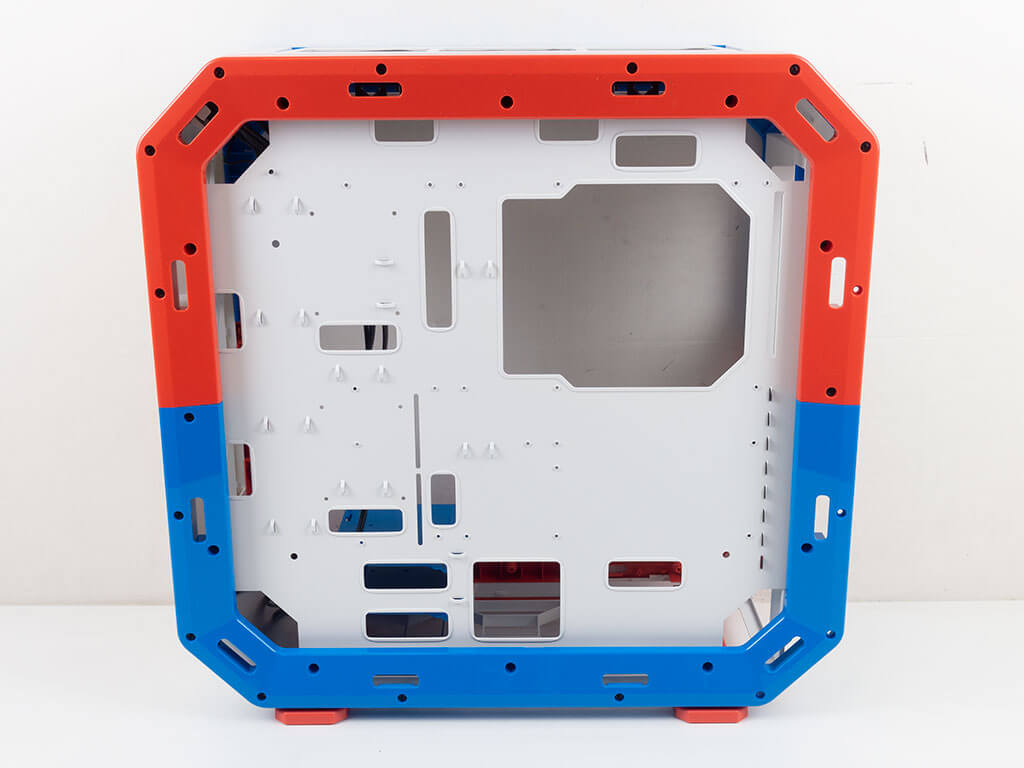
Diving into the interior of the InWin Airforce, we are presented with a classic layout that only lacks the shroud usually found in modern cases these days. The metal motherboard tray has lots of openings for cable routing, as well as a large cutout for easily accessing the CPU cooler mounting plate you may employ.


In the front, the two separate, but identical HDD cages may each hold one 2.5" and one 3.5" drive. Any such drive will have its connectors facing towards the motherboard tray. While it is nice to have the ability to add an SSD to each of these parts, it feels a little bit like an afterthought. InWin has drilled the four required holes into these blue components, but the cutouts of the motherboard tray won't give you easy access to them. Above that are the aforementioned mounting positions for the fans. You may also install a radiator setup of up to 360 mm here without worrying about losing any storage capabilities. Looking a bit over to the left, you can make out two more 2.5" mounting positions with well-placed openings in the motherboard tray for clean cable routing.


In the rear, the PSU bay almost blends in completely with the frame of the InWin Airforce. There is plenty of room for potent units and a large opening in the motherboard tray to route all the cables out of view. Above that are the eight expansion-slot covers we added during the build process, with the already mentioned fan placement in the very top. At this angle, you can also see that there is loads of space above, so putting a second 360 mm radiator setup into the ceiling won't interfere with any components, either.


The two openings in the motherboard tray for the HDD cages are next to the square one for the PSU leads. As mentioned, the 2.5" drives will need a bit of trickery to get to. InWin could have just made this hole square too, just to give you a little bit more room to play with. And if they made this hole the same size as the one for the PSU wires, identical grommets could have been used to cover them for an even cleaner look. All the hooks for cable management are concentrated towards the front of the case, and there are many, which is very nice to see.

Taking a quick look at the ceiling of the InWin Airforce, you can see ample room for active cooling purposes, with the mounting for the fans or radiator centered. With the 45° angled corners of the case, the added height doesn't feel super bulky, but provides the benefit of additional space.
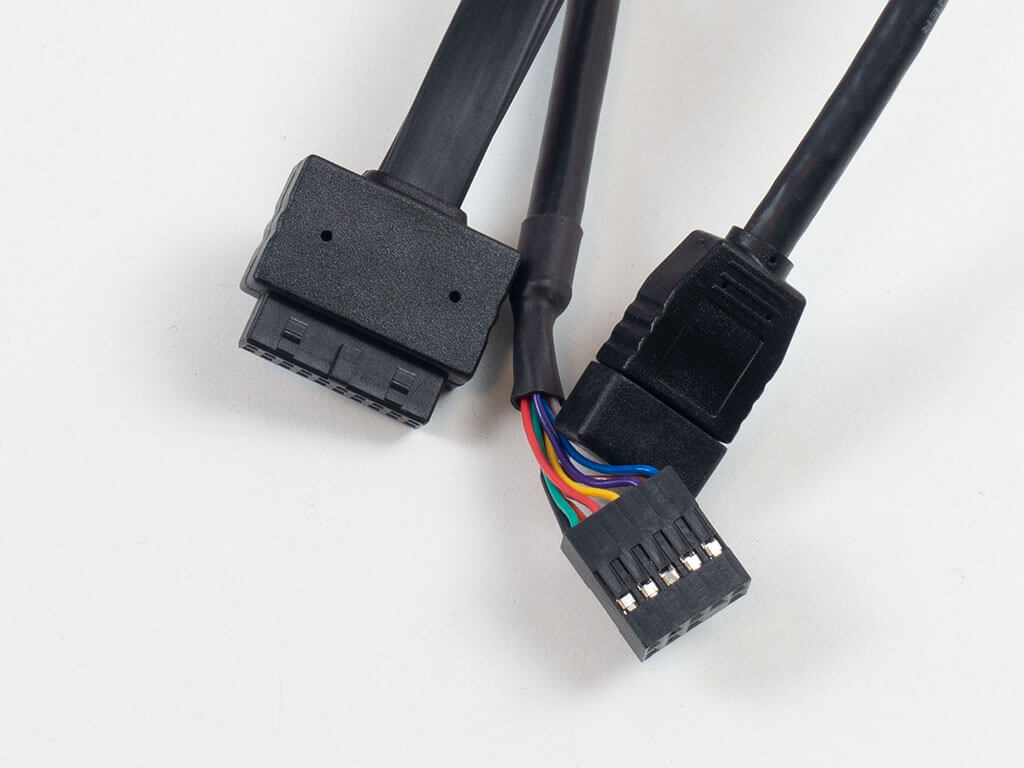

All the leads within are sleeved black and should present no issues, connecting properly to any modern motherboard. What is weird is the very old school case connector wiring. These days, power LED wires come in individual pins to ensure compatibility for both two or three-pin motherboard headers, though the vast majority of boards use the same header layout. On top of that, there is no +/- labeling on these LED leads, so you have to take the odds of these working once the system has been turned on.
InWin BR36 Liquid Cooler


InWin also sent us their BR36 AIO to utilize for this case review. It is a 360 mm all-in-one unit with a unique CPU block setup which provides active cooling. It ships in a full-color box with an image of the unit on front and all the usual details on the back. A cardboard tray holds all the bits and pieces in place securely.


Naturally, the unit comes with all the usual mounting parts for AMD as well as Intel CPUs. You should also be able to get an LGA1700 kit from InWin if needed. There are three bundles of wires within the package: one for wiring up the fans, another for the CPU block, and the third as part of an ARGB controller should your motherboard not provide that functionality.

Out of the box, the InWin BR36 comes with the usual radiator we have seen used with most AIO CPU coolers out there. The tubes are sleeved and of ample length, so reaching your CPU even when installing the 360 mm radiator in larger cases shouldn't be a problem.


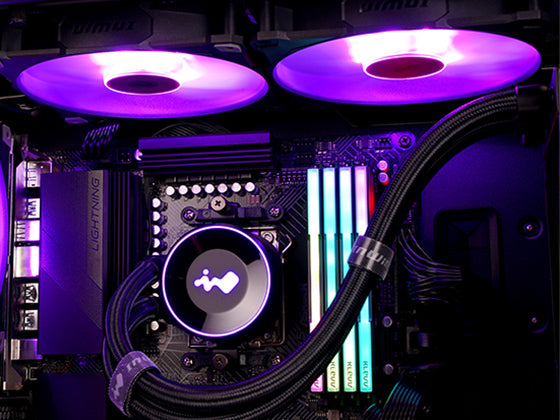
The unit features an in-line pump that is separate from the base of the cooler. A braided 3-pin lead provides both power and RPM control for the motherboard it is connected to. The real differentiator from other AIO CPU coolers is the base. It features ARGB elements and a unique 3-bladed fan for much needed airflow around the CPU socket, which is usually provided by classic air-coolers. The base of the block is actually nice and smooth, and secured by eight screws. You will have to clip on the right mounting hardware for your socket, which is easily done as it requires no tools or screws.

Just like with other InWin AIO CPU coolers, one central connector on the base is there to connect all the cables from the fans and ARGB, which are then unified to provide a single PWM and an ARGB lead to the motherboard. Only the pump itself is also attached to the motherboard directly.


The BR36 actually employs the same Luna AL120 fans as the InWin Airforce. These have hub-mounted ARGB elements, and silicone pads on the corners as an anti-vibration measure.


However, InWin wired the included fans up differently, using shorter cables and a proprietary ARGB connector, which means these fans can't be re-purposed easily. That said, it at least ensures the ARGB leads do not come apart easily with the plastic clips. On the frame of these units, you will find an arrow to let you know which way air will be pushed, and some company branding.


Preparing the motherboard for assembly is essentially done the same way as any other cooler these days. However, the backplate InWin has designed is excellent, easily allowing you to line up the mounting holes regardless of the socket by simply turning the dials on each corner. Once in place, large hex spacer screws hold it in place. All you need to do on the BR36 is add the fans and clip the right mounting hardware onto the base.
InWin P125 1250 Watt PSU


InWin also sent along one of their new P Series power supplies. This line starts at 650 watts and goes all the way up to 1250 watts. We received the InWin P125, which is the strongest P series PSU at 1250 watts, and it is 80 Plus Gold certified. It ships in a full-color box with an image of the power supply on front and all the usual details on the back.


InWin includes some thick and sturdy zip ties, a set of screws, and the usual power cable with the PSU. Instead of a manual, a business card with a QR code takes you to the digital copy. As the P125 is a fully modular unit, none of the cables are attached. These are of the flexible, flat variant so popular with brands lately.

Even though the P125 can deliver 1250 watts, it is rather compact at just 160 mm long. It employs a 135 mm FDB fan that only turns on at loads above 20%, making the P125 semi-passive.


All the plugs for the cables are flush with the housing. As such, the P125 will truly fit into cases that have a 160 mm limit, which happens to exactly be what the InWin Explorer is officially able to handle. The unit's rating can be found on a sticker on the large, solid side, while both smaller panels come with the black and yellow device-specific numbers, so what is powering the system in front of them should be obvious to any onlooker.
Review System
| System Parts for Case Reviews | |
|---|---|
| Processor: | ATX: Intel Core i5-11600K mATX/ITX: Intel Core i5-10600K |
| Motherboards: | ATX: Gigabyte Z590 AORUS PRO AX ITX: Gigabyte Z590I Vision D mATX: ASRock B560M Steel Legend |
| Graphics Card: | Palit GeForce RTX 2080 Gaming Pro OC ZOTAC GAMING GeForce RTX 3060 Ti Twin Edge OC |
| Memory: | 16 GB XPG SPECTRIX D50 3200 MHz 16 GB XPG SPECTRIX D60G DDR4 3000 MHz 16 GB XPG GAMMIX D20 DDR4 3200 MHz |
| HDD: | Toshiba MG08ADA400E 7200 RPM SATA III |
| SSD: | ATX:XPG SPECTRIX S20G 500 GB mATX: XPG GAMMIX S50 Lite 1 TB ITX: ADATA Falcon 512 GB ADATA Ultimate SU800 512 GB ADATA Ultimate SU720 500 GB |
| Power Supply: | InWin P125 1250 Watt 80 Plus Gold PSU |
| Cooling: | InWin BR36 Liquid Cooler |
Assembly

Installing a motherboard within the InWin Airforce is done by utilizing classic stand-offs and screws. There is lots of room around the ATX board with some well-placed openings to route leads through. If you are employing an E-ATX variant, you will loose access to the main cutouts to the right of the board, and depending on the width of the motherboard, the SSD placements will probably also bite the bucket. In other words, while E-ATX is certainly possible, it is not really useful within the InWin Airforce.

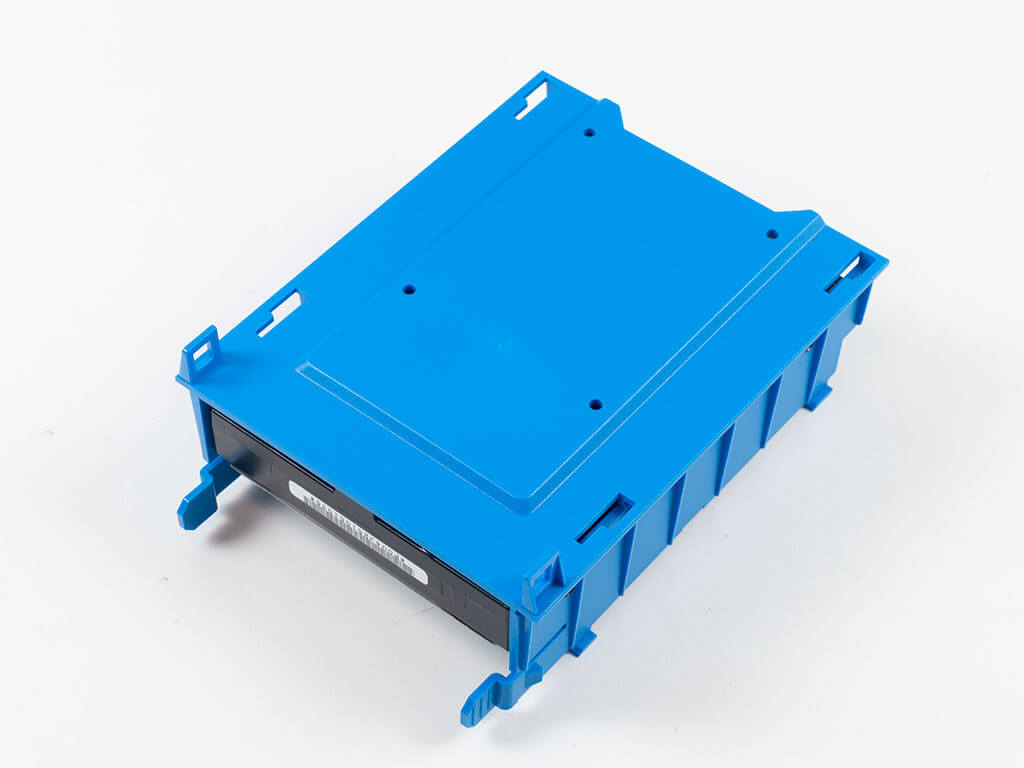

Adding a 3.5" drive to the blue part is done with classic screws as well. If you are also installing a 2.5" variant, it needs to be secured before the 3.5" drive. The front of the storage unit lines up nicely with the edge of the blue plastic. Once filled, simply slide and clip it back into place.

To mount an SSD to the motherboard tray, screw it down with the connectors facing the opening—that's it.


As InWin provided the BR36, we installed it in the ceiling. Even with such a sizable unit, there is plenty of room for wire management and the motherboard, so you won't have to worry about these components colliding.


With all the other components in place, adding the GPU and PSU is straightforward as well, with screws to hold them down. You may also install the GPU support bracket at this point.

Lastly, as the fans come separately packaged with the InWin Airforce, we installed three of them in the front and one in the rear. While the classic setup most ARGB fan-equipped cases come in these days, we also did so because of the SR36 in the ceiling of the chassis.


With everything installed, the interior of the InWin Airforce makes a pretty clean impression even though there are no grommets. While such an addition would have certainly helped, thanks to well-placed cutouts, all leads are hidden from view quickly. That said, we could have in hindsight wired the audio and fan cables on the bottom edge of the motherboard slightly better. Owing to all the hooks for zip ties on the backside, all cables are secured. As we went in stages, first securing all the fan and ARGB wiring before the motherboard leads and, lastly, the PSU cables, we ended up using more of the points to secure zip ties to than you may need if you were to unify things.
Finished Looks


Turning the InWin Airforce on feels very much like having a bulky, functional, larger than average mid-tower case. The three ARGB fans in the front are clearly visible through the cloth mesh, and a blue power LED lights up in the I/O panel to let you know things are up and running.


In the front of the Airforce, each fan is symmetrically framed by the shell structure, and looking closely, some of the details of the hardware behind these can be made out, which bodes well for cooling performance. In the rear, everything is where you would expect it in a modern ATX mid-tower case. Thus, no surprises here.


The noticeable tint on the glass side panels does considerably mute any ARGB elements of your components, but you can still make out the hardware owing to white surroundings. If you opt for the "Phantom Black" variant, that will surely be harder to do. All the wires behind the motherboard tray, on the other hand, will benefit from both the tint of the glass and the all-black case variant. Even so, the "Justice White" Airforce manages to keep the messy details of the wiring at bay well enough.
Thermal Stress Test
| Testing Hardware | |
|---|---|
| Processor: | Intel Core i5-9600K |
| Motherboards: | ASRock B365M-ITX/ac LGA 1151 |
| Graphics Card: | ZOTAC GAMING GeForce RTX 3060 Ti Twin Edge OC |
| SSD: | ADATA Swordfish 256 GB M.2 NVMe SSD |
| Memory: | 16 GB XPG GAMMIX D20 DDR4 3200 MHz |
| Cooling: | Noctua NH-L9x65 Low-Profile CPU Cooler |
| Thermal Paste: | Arctic MX-5 Thermal Compound |
| PSU: | ATX: Fractal Design Ion+ 650 Watt 80 Plus Gold SFX: Fractal Design Ion SFX-L 650 Watt 80 Plus Gold |
| Fan Hub: | Lamptron SP105 8-port PWM Fan Hub |


Our test setup focuses on four components small enough to fit into every chassis format. This allows us to compare the impact case size and cooling have on a modern system. Each of the four measured components is connected to a REED Instruments SD-947 Data Logging Thermometer with K-Type sensors that have been placed as closely as possible to the benchmarked areas of the CPU, GPU, M.2 SSD, and motherboard chipset. A fifth sensor is used to monitor the room temperature for an accurate delta T result.
For the cases, the out-of-the-box fan setup is used, connected to the motherboard, with the board adjusting fan speed automatically. This puts the onus of noise and performance on the case manufacturers and motivates them to actually care about thermal performance instead of simply using active cooling as a marketing bulletin point.
On the software side, the test setup includes Windows 10 Pro with Furmark and Prime95 both running at the same time to put the maximum load on both the processor and the graphics card.
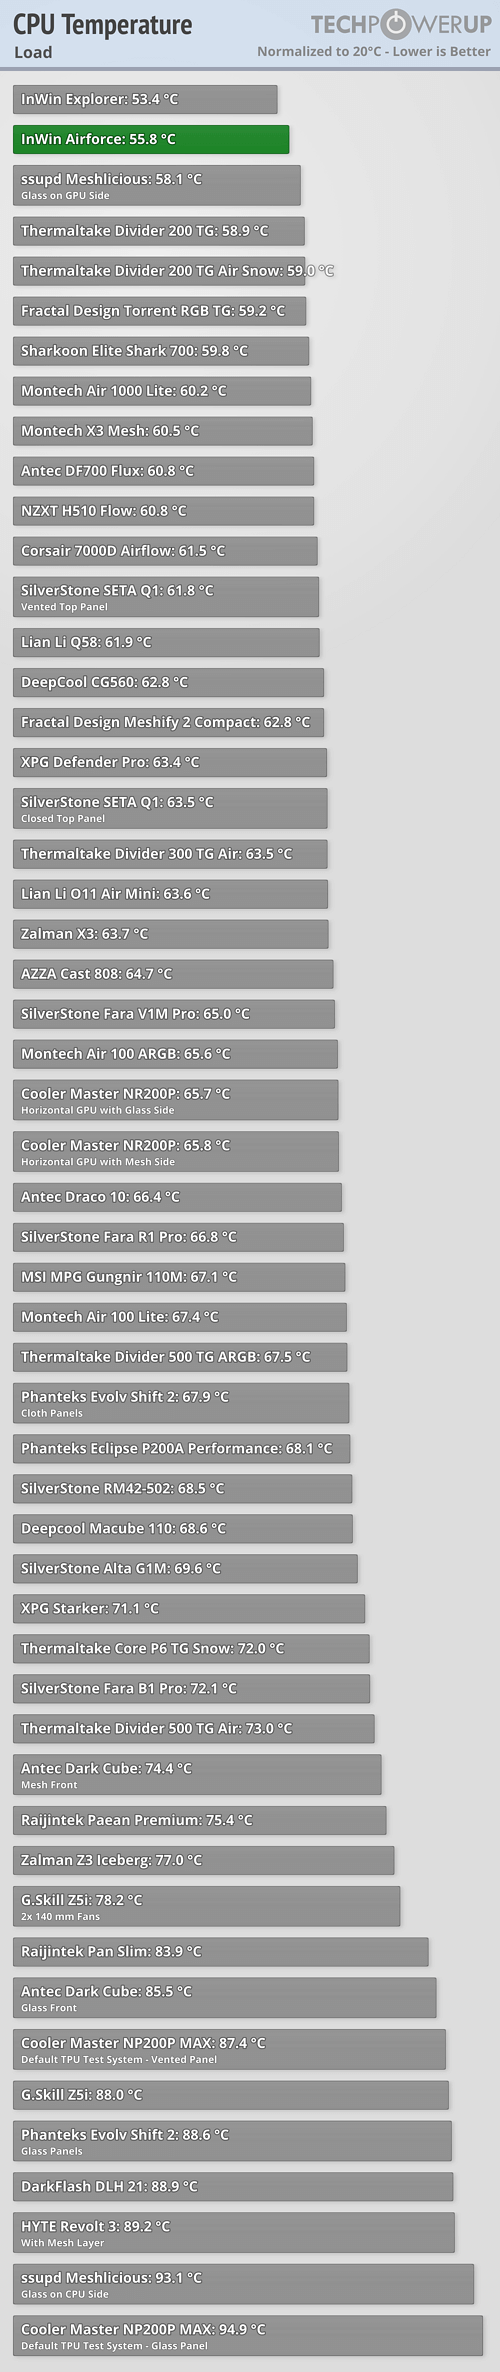
We let the chassis sit at idle until temperatures reach equilibrium. Next, our stress-testing load is started, and it continues to run until temperatures are stable. The temperature result for each section of the case is the highest value measured during the test run. All reported temperatures are normalized to 20°C room temperature.

Comparison


Gaming Stress Test
To measure how the case and our standard hardware stacks up in gaming, we let the system cool down to a reasonable level and then used Doom Eternal with VSync off at 1080P and full details to let the GPU throw everything it can at the system. By turning off VSync, the GPU renders all the frames it possibly can, thus eliminating any bottlenecks due to the monitor refresh rate. Once again, this system was left running for 30 minutes to allow for temperatures to level out.

Comparison


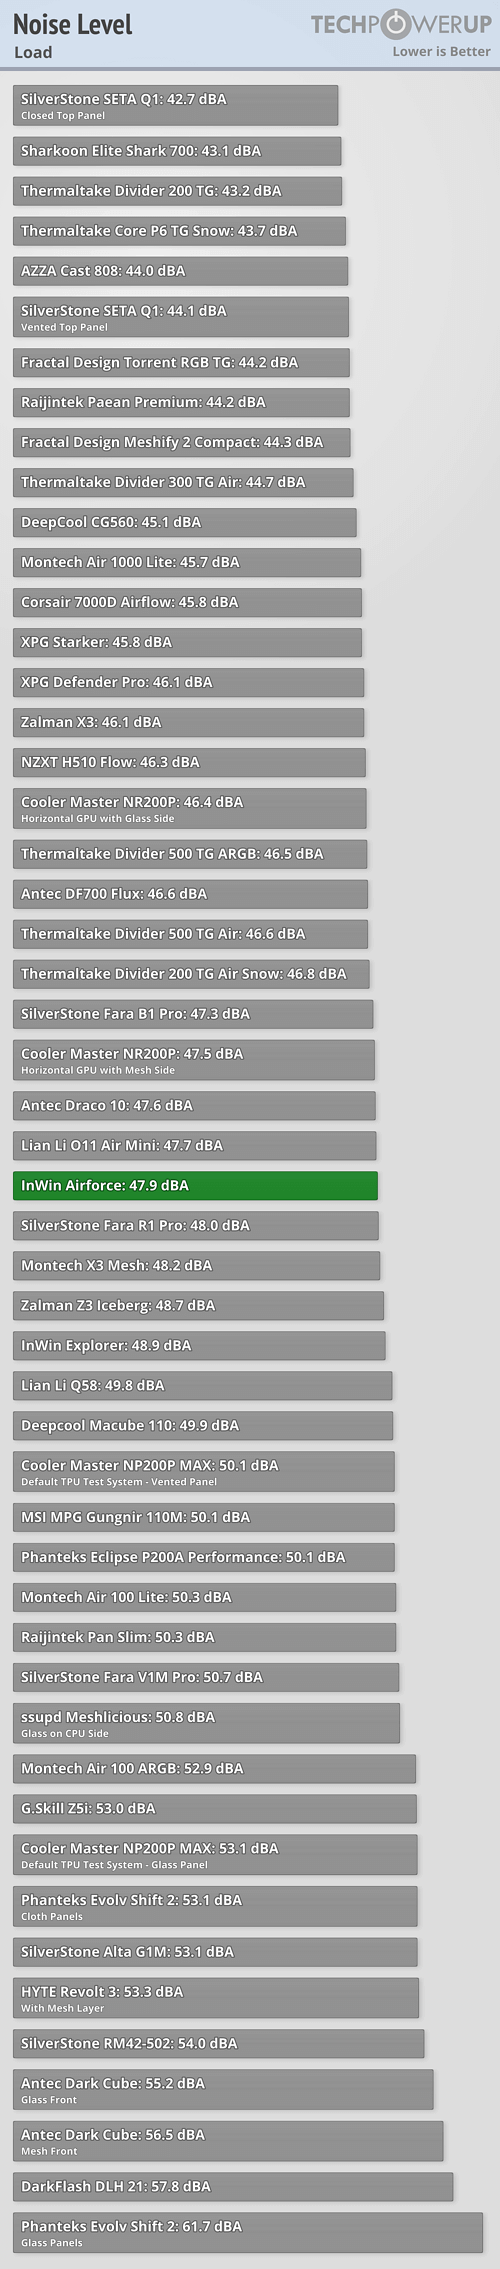
Noise Testing
Noise levels are recorded with a calibrated REED Instruments R8050 Sound Level Meter, Type 2. It is placed at chassis height on a Manfrotto Tripod. Measurements are taken from a 45° angle towards the case, at a distance of 10 cm to the closest edge of the chassis.

Value and Conclusion

The InWin Airforce has an MSRP of US$180 excl. taxes.

- Unique assembly experience
- "Justice White" a fun and unique way to explore the flat-packed, modular design
- Four retail-packaged Luna AL120 fans included
- Loads of room for dual 360 mm liquid cooling setup
- GPU support bracket included
- Unique, tool-less glass panel locking system
- Lots of hooks for cable management
- Cloth dust filters in front and top of case
- Can hold up to six hard drives
- Plenty of room for long GPUs, up to 390 mm
- All but the biggest air-coolers will fit
- Modern, well-equipped I/O panel

- Lots of plastic
- Having the assembly experience comes at a cost
- Weird cable to connect case LEDs without polarity information
- While doable, assembly could be a little more clear-cut
- No dust filter on underside
- Feet have a bit of play
- Grommets would have been nice
- Using an E-ATX board comes with compromises
- 2.5" drives not part of cutout for drive bays
Both the InWin Airforce and Explorer aim to introduce the IKEA-style assembly experience of PC cases to the mass market. And while InWin has achieved that goal at the core of the experience with both enclosures since we end up with functional, usable cases, the Airflow seems to benefit from that scenario a lot more. It does so both in terms of shipping vs. assembled size and the number of separate parts and the assembly process without compromising on much to ship flat-packed. That is where the fairly bulky and simple ITX-based Explorer does not manage to paint such a clear picture.
However, we are focusing on the Airforce here, and its assembly process is complicated somewhat by the higher part count, with the assembly manual providing ample detail to get it done if you read the documentation properly. This is a classic scenario of not ignoring the documentation and winging it, especially as InWin does at times bunch up several of the smaller steps into a larger one, and some of the parts are very similar but need to be placed in their right spots.
The result is a spacious and capable E-ATX case. While there is some compromise when using such a large motherboard format, those employing an ATX variant will be presented with plenty of room for potent hardware and great liquid-cooling potential. There are a few elements that are slightly irritating, like the lack of a dust filter on the floor and grommets or feet that could be attached better, but the end result is a fun, colorful, uniquely different case. Even if priced a little on the high side, with its four retail packaged fans, the case itself clocks in around $140, which isn't the biggest premium to pay for the build experience and refreshingly different look even if you have to contend with a bit more plastic than we have become accustomed to these days.


![[Cowcot TV] IN WIN AIR FORCE : Le boitier LEGO technique](http://estore.in-win.com/cdn/shop/articles/cowcot_1242x.jpg?v=1654498697)